If I could have a massive garden that took hours and hours of work and cost me an absolute packet, I would. But I've adjusted to my circumstances. A small balcony that gets almost no sunlight is all the space I have to work with, and the Sophie-wages wouldn't cover the kind of gardening spending habit I'd love to have (hello, acres of roses). Between full time work and post-graduate study, I probably don't have time to maintain a massive and exotic garden just now anyway.
My limited experience creating and maintaining my balcony garden has taught me a few things about what to do and what NOT to do if you don't want to waste time, energy and money but you want great results.
Learn the limitations of your space.
As stated above, my balcony gets very little sunlight. Your garden space might get hot sun all day, or no sun at all. It might have sandy soil or rich, dark dirt. You might live in a dry area or one with plenty of rainfall. Think about these factors: they matter.
Choose plants that match your space.
Boy, did I get this wrong. I killed miniature roses, petunias, pansies, gerberas, tomatoes, salad leaves, all kinds of herbs, portulacas, cordylines, flax, and about twenty other kinds of plants before I realised that my choices were all wrong for my space. I wasted about $300 on plants that were never going to survive in the environment I had available. Some day I'll have a wonderful vegetable patch, herb garden and more rose bushes than you could imagine, but it's not going to happen on my balcony. Now I grow ficus, calanchoes, rhea, philodendrons, and even a small umbrella tree, amongst other things.
Phone a friend.
Unless you're already a gardening expert, there's bound to be someone in your life who knows more about plants than you do. I finally caved in and asked my Dad for help after several rounds of "oh gosh all my plants are dead" and he was a huge help! If you don't have someone to ask, ask the internets. Googling "shade tolerant plants" is a fantastic way to find endless resources on your particular gardening issue.
Start small.
Don't go out and buy enough plants for your whole garden. You have no guarantee that you'll still be interested in gardening a month or a year from now, or that the plants you pick will be right for your space (even if you've done your research). It's a bit like borrowing your neighbour's dog for a week to teach your kids about the responsibility of pet ownership. If you can keep your first selection of plants alive for more than three months, it's time to buy a few more. Take it slow. Nature will still be there once you're sure you won't forget to water the roses.
Don't buy at the usual places.
Large plastic pots with good drainage cost about $20 each from Bunnings, or $3.50 each from the Reject Shop. Plants are far cheaper bought from wholesale nurseries, market gardens and community plant sales than from a retail nursery.
Get creative.
I bought the wrong kind of pots initially - no drainage! One of my aunts took one look at the pots and asked why I didn't just use a hammer and nail to knock drainage holes in the bottom of the pots. Duh. I use stools and mini-shelves I already owned to stand pots on at different heights for the look I was after on my balcony. Think outside the square and your garden will be even more unique.

Friday, 27 April 2012
Friday, 20 April 2012
Saving on Groceries
I've recently cut my weekly grocery bill from $250 to $150... Which is still relatively high for a two-person household! I've got some work to do to get it lower, but I thought I'd share the ways I've cut it down by 40% so far.
I cook. A lot.
It's much cheaper to cook a meal at home than to buy take-away. Everyone knows that. We always cooked most of the meals we eat, but I've upped the ante lately. It would be rare for us to have take-away more than once a fortnight at the very most now. I cook tasty, reasonably nutritious meals at home, and I think it's improving our health as well as the grocery bill.
I plan every meal for the week, without exception.
This requires a little bit of work - but I enjoy it! I plan breakfast, lunch, dinner and snacks for two people for the whole week. This means that you won't be running out of food and running out to a fast food place / the supermarket as a result. Or, much more of an issue for me, buying twice as much food as you really need because you overestimate how much you'll eat.
I audit the pantry.
A tidy pantry is an absolute must unless you want to spend a fortune on ingredients you already have on hand, or fail to buy them because you haven't realised that the packet of icing sugar in the back of the cupboard is two years past its use-by date. Before I write the menu for the next week I check what we have and I often base meals around what we have available.
I only shop once a week.
Every time you go to the supermarket, you pick up a few things that aren't on your list. The less frequently you shop, the fewer "extras" you'll be buying.
I make more things from "scratch" at home.
Okay, tipping some bread mix into the bread maker isn't really cooking from scratch, is it? But I get the same super fresh, delicious loaf of multigrain bread as I'd buy at the bakery for $5 minimum... And it's only cost me $2 for the breadmix and yeast, plus minimal costs for water and electricity. I could buy bread cheaper than that, but it wouldn't be anywhere near the same quality. I make pizza dough in the bread maker too - it tastes better than shop-bought pizza bases and it's cheaper. At Christmas time I used the bread maker to make jam for my family. I haven't discovered all the functions yet but that machine has well and truly won a place in my heart.
We cook large batches.
I only have a relatively small fridge and freezer, but even so it's possible to cook meals in large batches and freeze them for later. Chilli con carne? That can be burritos one week, quesadillas the next and tacos the week after that. Perfect Boyfriend's bolognese sauce can keep me happy for weeks with small serves dragged out of the freezer and warmed for dinner on a cold night.
I only buy what I'll actually eat.
This has been a real issue for me in the past. I eat something once and love it, so I think I'll suddenly start eating it every day. Nope. It just goes to waste.
I need very few cleaning products now that I'm on board the Enjo train.
I'm sure I'll discuss this in greater detail in another post, but if you've been buying as many bottles of shower cleaner as I used to, you'll understand that not buying cleaning chemicals or paper towels is fantastic for the wallet. I wish I'd invested in long-life cleaning materials sooner.
None of these improvements has resulted in a lower standard of living in my little household- if anything, it's been the opposite. And I feel great about not wasting as much food as I once did.
Monday, 16 April 2012
Tonight's Dinner: Bacon, Zucchini and Asparagus Pasta
I'm always on the lookout for tasty and easy dinners. One of my recent finds is this bacon, zucchini and asparagus pasta.
It's not exactly healthy, but it does contain a lot of vegetables and makes good leftovers for lunch the next day.

Zucchini is currently my favourite vegetable, I can't get enough of it! The secret ingredient in this recipe however is the anchovies. I know anchovies are an acquired taste, but they are amazing in something like this. They melt away and leave an intense salty flavour that soaks into the vegetables. Yum!

The sauce will taste very strong before the pasta is added. The lemon juice and cream cheese help to balance the anchovies.

The pasta is definitely worth trying if you like anchovies. If you don't, the pasta is probably (almost) as good without them.
Hmmm I really need to work on my food photography... and iron my tea towels apparently!
Saturday, 14 April 2012
Hot Cross Buns and Easter Fudge
Easter was fairly quiet this year giving me a chance to spend some quality time in the kitchen.
After reading Sophie's post I was inspired to give hot cross buns a go. I used a recipe from Taste.com, which was easy enough to follow. I've never attempted to bake anything with yeast before, but it was surprisingly simple. Mix yeast, sugar and milk, wait ten minutes... Add wet ingredients to dry ingredients, knead dough, wait two hours... form buns and put into baking tray, wait another hour... Simple enough, but with LOTS of waiting.
Still, the wait was worth it. Seeing how much the buns had risen was very rewarding.
Taking them out of the oven and eating them was even better!
I had the same problem as Sophie with the crosses however. According to my baker brother, it's because I was using the wrong flour. He recommended rice flour. I will have to investigate this next time.
In between waiting for the hot cross buns to rise, I also made Easter fudge. Fudge at Easter is a tradition in my family. My Nana makes it, my Mum makes it and as of this year, I make it. My family prefers a crumbly fudge (which I think is called Scottish tablet ) but my previous attempts to make it have not gone well. It requires a level of precision that I don't seem to have and can easily burn. So instead I make cheat's fudge. I've unfortunately lost the original recipe and I can no longer find it on the internet... luckily it's easy enough to remember.
Add two blocks of chocolate (I used dark chocolate but you can use a mix of milk and dark), a can of condensed milk, about 30 grams of butter and a pinch of salt to a pot.

Stir until melted and combined, then remove from heat. Add tasty extras like macadamias, pistachios, dried fruit, etc. Pour into a lined baking tray. Allow to cool slightly and then refrigerate for at least three hours.

This fudge has a smooth, creamy texture which is quite different from traditional fudge. The results seem like they require a lot more effort then they really do - especially when you dress it up like this.

If you have a sweet tooth, this recipe is definitely worth a try!
After reading Sophie's post I was inspired to give hot cross buns a go. I used a recipe from Taste.com, which was easy enough to follow. I've never attempted to bake anything with yeast before, but it was surprisingly simple. Mix yeast, sugar and milk, wait ten minutes... Add wet ingredients to dry ingredients, knead dough, wait two hours... form buns and put into baking tray, wait another hour... Simple enough, but with LOTS of waiting.
Still, the wait was worth it. Seeing how much the buns had risen was very rewarding.

Taking them out of the oven and eating them was even better!
I had the same problem as Sophie with the crosses however. According to my baker brother, it's because I was using the wrong flour. He recommended rice flour. I will have to investigate this next time.
In between waiting for the hot cross buns to rise, I also made Easter fudge. Fudge at Easter is a tradition in my family. My Nana makes it, my Mum makes it and as of this year, I make it. My family prefers a crumbly fudge (which I think is called Scottish tablet ) but my previous attempts to make it have not gone well. It requires a level of precision that I don't seem to have and can easily burn. So instead I make cheat's fudge. I've unfortunately lost the original recipe and I can no longer find it on the internet... luckily it's easy enough to remember.
Add two blocks of chocolate (I used dark chocolate but you can use a mix of milk and dark), a can of condensed milk, about 30 grams of butter and a pinch of salt to a pot.

Stir until melted and combined, then remove from heat. Add tasty extras like macadamias, pistachios, dried fruit, etc. Pour into a lined baking tray. Allow to cool slightly and then refrigerate for at least three hours.

This fudge has a smooth, creamy texture which is quite different from traditional fudge. The results seem like they require a lot more effort then they really do - especially when you dress it up like this.

If you have a sweet tooth, this recipe is definitely worth a try!
Friday, 13 April 2012
Frugal Coffee Drinking
An
exceptionally frugal colleague of mine asked me this week: is it cheaper to
drink coffee made in a plunger, or coffee in those little instant sachets you
just add hot water to?
I don’t think he realised what he had unleashed until I provided him with the following breakdown.
Our office provides boiling water, milk, sugar, and poor quality instant coffee powder. So theoretically we could drink coffee all day for free - except that the free coffee powder is disgusting. That’s option one: free, disgusting coffee.
Another option is to buy a jar of decent quality instant coffee powder and use it instead of the gross stuff. A 200g jar of Nescafe Gold costs $16.69 and contains 117 servings, so that’s 14.26 cents per cup of coffee.

Or you could
buy ground coffee and a plunger. A single serve plunger will cost you anywhere
from $10 up. Let’s assume you’re reasonably savvy and buy it at that price. A 200g package
of ground coffee costs $6.93 and contains approximately 40 servings, so each
cup of coffee costs you 17.33 cents plus your capital outlay of $10 for the
plunger.

My frugal
colleague uses ground coffee in a plunger some of the time, but he also uses
instant sachets for cappuccinos on other days. They cost 63 cents each, so I
was able to give him the quick answer that the plunger-made coffee was cheaper
than the sachets.

There’s a
more luxurious option: buy yourself a coffee machine and a thermos, and bring
your hot coffee into work. Let’s say you’re lazy like me, so the only way
you’re going to use a coffee machine is if it’s easy – this limits your choice
to the machines that turn tiny alfoil sachets into coffee. I don’t understand
this process, so I assume it’s some kind of magic involving tiny alchemist barista elves. I’ve been looking at buying
a Nespresso Pixie as a present for someone, and it seems like the best price
is about $300. A good quality thermos costs $20. The
Nespresso capsules cost between 68 and 75 cents each. You’ll be using your own
milk for this scenario, and 250ml of milk will cost you about 41 cents. So this
option requires a capital outlay of $320 plus a cost per cup of at least $1.09. This is relatively expensive in terms of "homemade" coffee, but cheaper than buying a barista-made cup by a wide margin.

Of course you
could always do what I did for years, and treat yourself to a café coffee each
morning. The café at the foot of my office building provides a discount to
local workers, so a regular sized flat white sets you back $3 instead of $4.50
(or more) at other cafes. The staff all learnt my name within a few weeks of the building opening, which I LOVE but I also think is probably a ploy to inspire brand loyalty. It works - if I'm buying a coffee during my work day, there's no way I'm going anywhere other than that Coffee Club outlet. I used to think it was just fine to spend $3 on a cup
of coffee every day. Then it occurred to me to start looking at my expenses as
annual costs rather than daily, weekly or monthly expenditure. Assuming you get
four weeks of annual leave, you work about 240 days a year. That $3 cup of
coffee just turned into a $720 annual fee.

Don’t get me
wrong – I don’t think it’s always
worth spending less money than you could on life’s little luxuries. Some days I
really want that flat white, so I buy one, and I don’t feel guilty. But your
everyday habits involving small amounts of cash add up in the long term. That’s
why it’s a good exercise to look at your budget and expenditure across the
year, not just that pay period. You might love coffee enough to spend $720 a
year just for that morning cup on work days. I don’t. I love it enough to bring
my own jar of instant coffee into work and drink that most days (that’s a
$34.22 a year habit) and only buy barista coffees when I really,
really want one. Because if that means I spend $500 less a year on coffee, that’s
$500 a year I could spend on clothes, books, eating out
at fancy restaurants, or paying down the mortgage. Or if you’re digging your
way out of poverty, it’s $500 towards your emergency fund or paid off your
credit card debt.
I would also
think about the other factors here – are you really going to bother making a
cup of coffee at home each day and carrying it in to your office in a thermos,
or is that too hard for you? I don’t know that I’d bother to do it. Do you feel
like the break from staring at the computer screen for fifteen minutes is worth
the cost of the coffee you buy on that trip to the café? I know a lot of people
cherish that coffee buying break, so it's worth it to them. If every cent you earned was committed to
other areas, you’d be willing to drink that gross free coffee to avoid
overdrafts on your bank account, but otherwise the point of mindful spending isn’t always to spend
as little as possible. It’s that you know
how much your coffee costs so you can choose whether or not it’s worth the
money to you.
Keep in mind that my costings are based on only one cup a day, and having an office that provides everything you need for your coffee - except that its coffee powder will make your eyes water, and not in a good way.
Luckily my
colleague was very patient with me while I gave him a full cost analysis of his coffee options.
Thursday, 12 April 2012
Adventures with the Cookie Press
I finally got my hands on the family recipe for "forcer cookies". They're custard cookies made using a cookie press, also known as a cookie forcer. I just had to take a million photos because they're super cute!

Here you can see my cookie press, which is very modern...

And a 1970s (I think) model which my aunty bought on ebay:

This 1970s model is very similar to the one my aunty uses, which she bought in 1973 for $4.50. My cookie press was a present, but I'm guessing they cost a fair bit more than $4.50 these days.
You can see how the range of aluminium shapes compares with the vintage selection on the left, and the selection for the modern model on the right:

And you can see the shapes I tried out this time...


I can't share my recipe because it's a family secret. But there are lots of great recipes out there for custard cookies. I recommend googling "cookie recipe custard powder" or similar. And custard cookies taste best when made into little sandwiches with vanilla icing as the filling.
Now it must be time for a cup of tea and a custard cookie!

Monday, 9 April 2012
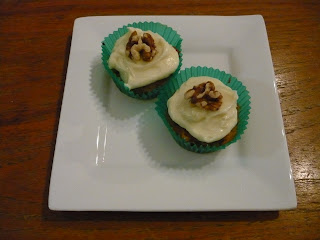
Carrot Cake - No Egg!
These little cakes are moist, flavourful and a real hit.
Ingredients:
1 1/2 cups self raising flour
1 teaspoon cinnamon
1 teaspoon nutmeg
1 teaspoon mixed spice
2/3 cup brown sugar
175ml vegetable oil
200ml plain yoghurt
1 tablespoon milk
2 carrots
150g walnuts
250g cream cheese
50g butter
1/4 cup maple syrup
300g icing sugar
Peel and grate carrots and chop 100g of the walnuts. Combine flour, spices and sugar. Whisk oil, yoghurt and milk together in a separate bowl and then fold into the dry mixture. Fold in carrot and chopped walnuts.
Fill patty pans and bake for about 25 minutes at 160C. Test them by inserting a skewer - it should come out clean when cakes are ready.
Leave cakes to cool and use an electric beater to combine cream cheese, butter and maple syrup. Add icing sugar in small amounts until icing is creamy and no longer lumpy.
Ice cakes and decorate with remaining walnuts. Enjoy!
Tips:
- Because these cakes don't contain egg, they are much moister than ordinary carrot cake and you need to make very sure they're cooked through. They need to be cooked at a lower temperature than most cakes, and for longer, because the yoghurt in the mixture slows down the baking process.
- This batter could make a great full-sized cake (carrot cake looks great as a loaf).
- If you don't have citrus allergies in your house, try adding the zest of an orange to the batter.
- I haven't tried to freeze these cakes, but they keep well in the fridge for several days.
Friday, 6 April 2012
Frugality Elsewhere
Between a broken toe and a cold, I've managed to forget all about which day it is and failed to write about frugality this week. I've failed to do much of anything except nap on the couch - but I do have a few baking projects for the Easter long weekend which I'll be sharing with you later on.
Luckily, other bloggers haven't been as lazy as I have, so here are some recommendations from this week:
Luckily, other bloggers haven't been as lazy as I have, so here are some recommendations from this week:
- J D Roth at Get Rich Slowly discussed shopping for the sake of shopping
- Frugal and Thriving featured a guest post on how lent can apply to the secular (which I particularly enjoyed because I almost always practice lent - but I wouldn't call myself a religious person)
- Lindy at Minting Nickels set herself some (mostly financial) goals for the next quarter
- MSN Smart Spending featured a post by David Ning on five money truths that aren't obvious
Monday, 2 April 2012
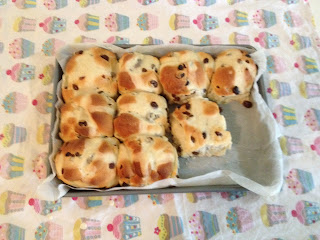
Hot Cross Buns
It's Easter time! Time for chocolate eggs, spending plenty of time with family and... hot cross buns.

I searched for an egg-free hot cross buns recipe and finally settled on this one. Perfect Boyfriend is allergic to eggs, citrus, peanuts and MSG... So I subbed out the mixed peel (and currants, because currants are clearly just second-rate sultanas) for extra sultanas.
This recipe wasn't as moist as other hot cross buns I've made. I don't know if that's down to the absence of eggs or to the lack of fats in the recipe - it is meant to be a healthy recipe and as such it doesn't have much in the way of butter or oil in it.
It wasn't hard to follow the recipe, but there were a lot of resting stages! Don't try this when you only have a few hours before you're leaving the house - I think it took about five hours from start to delicious finish for my little buns. As you can see, the crosses are sloppy-looking. If you try this recipe, I recommend making the cross mixture thicker than the ratios provided. Otherwise you'll have messy crosses like mine. However I did experiment with the glaze (leaving out the gelatine) and it worked just fine.
Best served warm, sliced in half and generously buttered.
Subscribe to:
Posts (Atom)